 USA
USA
 CA
CA EU
EU UK
UK AUS/NZ
A Test of the Hennessy Hammock in an Extreme Cold Weather Environment
PROBABLY THE ONLY HAMMOCK NORTH OF THE ARCTIC CIRCLE :
a Review by Ben Reynolds of the Royal Marines Commandos
It’s indisputable. Hennessy Hammocks could well be the best in the world. Light, durable, comfortable and excellently engineered… perfect for warmer areas of the world, right? Well, you will have seen from the website that ever evolving design solutions are attempting to expand the boundaries of the hammock inhabitable world, from calm low lying areas and comfortable lower latitudes, to where the silent killer reigns supreme…. cold. So, it was with Hennessy Hammock’s Explorer Ultralite Asym, along with elements of the insulated SuperShelter system that I found myself in Northern Norway in order to test whether the cold can be defeated by this intruder from the tropics.

THE TEST
CONDITIONS
The system was tested in the area of 68º 33’ 37.12’’N by 16º 58’.54’’E, east of Harstad, Norway. Initially mild temperatures prevailed, fluctuating around freezing, which resulted in freezing rain, sleet and snow. Though this is not the extreme cold that was later encountered, it was far more testing due to the freeze-thaw effect and moisture content of the air which accentuated the cold. Minimum temperature encountered was - 18ºC (0ºF) still air and estimated at -30ºC (-54ºF) with wind chill. Maximum precipitation encountered was 7.5cm (3 inches) of snow in 6 hrs.
COMPONENTS
The test consisted of an Explorer Ultralite Asym including canopy with undercover and foam insulation. A sleeping bag with a comfort rating of -10ºC (-54ºF) was used throughout.
TEST CRITERIA
The system was tested in all phases of use: (1) Carriage, (2) Set-up, (3) Occupation, (4) Take-down and (5) Conclusion. Each criteria is followed by Recommendations where they are not made in text. Instructions relating to perceived best usage are made throughout.
1. CARRIAGE. There are two components that contribute to easy carriage:
a. Weight. Hennessy Hammocks come at a variety of weights but none are heavy. The lightest weighs in at under 2lbs (0.9kg) which is highly competitive compared to one-man tents offering similar comfort. The additional components add a negligible amount of weight, approximately 1lb. In all the entire system is extremely weight effective for one-person to carry.
b. Volume. The stuff-sack in which the hammock and canopy arrives is a generous size which means you don’t need to remove the undercover from the main shelter. This was essential for rapid take-down of the system. The volume of all components, except the insulation, when in the stuff-sack totals approximately 5 litres (1.1gallons). The foam insulation, on the other hand, is very bulky. I found it impossible to compress the foam to the extent required to return it to the original packaging (similar to the hammock stuff sack). As the undercover remained with the hammock itself and the insulation wouldn’t fit, this second stuff sack was redundant. As with a normal roll mat, I found the foam to be best carried strapped to the outside of my pack. It is essential however, to waterproof against rain/snow etc which would render its insulation properties useless (see Recommendation 1).
Recommendation 1. There is no requirement for the stuff sack in which the under cover and foam insulation arrive. The undercover fits into the hammock stuff sack and the insulation, like all roll mats except the inflatable ThermaRest type, is so bulky it requires its own waterproof bag so it can be strapped to a pack. I suggest a bag made from the canopy material with a draw cord closure as a minimum. I waterproof all kit I really don’t want to get wet in a canoe bag. This guarantees against full immersion. To reduce the bulk perhaps you could add compression straps to the bag.
2. SET-UP. You don’t hang around in the arctic. Everything is done quickly because when you are still you don’t generate heat and therefore start to get cold. The first things to stop functioning are the extremities – fingers and toes. Therefore, the last thing you want to do is to remove your nice thick mittens in order to perform a fiddly task. The way some elements of the hammocks are set-up in warm climes therefore needs to be refined for extreme cold weather use:

a. Preparation. Before you venture out you should pack the hammock as detailed in Take-down. This enables the hammock to be erected with all the major components already attached. This should be down to the small details e.g. guy lines from the hammock passed through the undercover, undercover elastics and canopy attached to the sliding knot tensioner. The components should be stowed in such a way that they don’t get tangled.
b. Rope Ties. The method of lashing detailed on the hammock instructions and website is excellent, until the temperature fluctuates around freezing. When this occurs freeze-thaw and/or freezing rain becomes a factor ultimately resulting in the lashing freezing together so I developed a couple or different methods that have no need to tie or untie knots/lashings in the field:
i. Toggle (or karabiner) and Loops. This method is free provided the user is capable of making the toggle. As the photo below illustrates, several overhand loops are tied along the length of the rope and on the end of the rope a running noose in which a ben-reynolds wooden toggle is placed (cue pen knife). It is important that the toggle has an etching around its centre so that the rope does not slip. The toggle should be as small as possible in order to enable you to pass it through the webbing loops. Alternatively, remove the toggle, pass the rope through the webbing loop and then reinsert.


The toggle is passed through the webbing loops and then inserted through one of the overhand loops. Though there are only three overhand loops, when using two relatively close trees, the toggle can be passed through one overhand loop and then double back to another (see photo below). I found toggle and loops to be 100% secure.
ii. Karabiner. Through utilising a karabiner I found a method that is more adjustable but maybe not so secure as the loop and tie. As the photo below illustrates, a Figure-of-eight loop is tied at the end of the rope. This is then passed through the webbing loops then the karabiner is clipped in. A minimum of four turns around the karabiner (careful trial and error to establish the number of turns for your weight) are then made in order to secure the karabiner at the point giving optimum tension.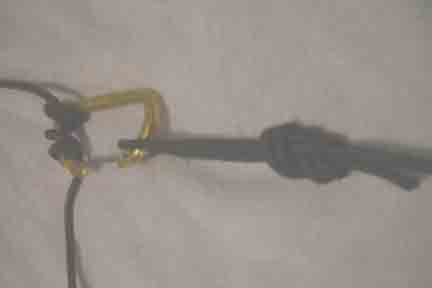
c. Insulation Elastics. Once the hammock is tensioned the side guy lines are appropriately located and then the insulation is inserted between the undercover and the hammock. As recommended by Tom Hennessey, I used a reflective space blanket on top of the foam insulation. The opening corresponds to the opening of the hammock. Pass the end elastics to the sliding knot tensioner, which by now is rather congested, and then find the side elastic loops. Rather than tying these, I used vegetation to secure the loops through the hammock’s side ‘O-rings’ as shown below.
d. Weighted Guy Lines. As suggested in the hammock instructions the guy lines can be weighted and in strong winds I found this to be an excellent method of securing the canopy on the windward side. In the bottom left of the photo a white pack cover has been filled with snow and attached to the guy ‘O-ring’. 
Recommendation 2. All components bar insulation should be formatted prior to erection in order to minimise exposure to the elements. A non-tying/lashing method of securing the hammock should be employed to minimise expose and reduce the effect of freeze-thaw. The sliding knot tensioner could be enlarged as it is utilised by so many components but this is not essential. Securing the insulation elastics requires simple methods for speed. A toggle on the end of the elastic which is passed through the ‘O-ring’ may be the simple solution.

3. OCCUPATION. Living in extreme cold conditions saps your energy. Once the day’s activities are completed you need to get out of the elements, stay warm and eat. The occupation is broken into several stages:
a. Entry. Kit that will be required is thrown into the hammock near the head end. This will include sleeping bag inside bivi bag, toothbrush, torch etc. Kit that is not required and wont fit into the shelter should be placed underneath the canopy in order to be as sheltered as possible from the elements (as in the photo above). Ideally a pack cover will be used to save the equipment from icing over. Before you enter it is important that all snow and ice is brushed off clothing, boots etc, otherwise should it melt your warm kit / sleeping bag may get wet. This is easily achieved when sitting in the hammock entrance, as shown below.
Next, before completely entering the hammock, your boots are removed, warm tent-boots are pulled on to protect your feet and then the removed boots are hung from the hammock’s central rope, as shown on the right. This is important as your boots need to be in contact with you body so that they do not freeze. I found that when hung from the centre rope they ended up between me and the side of the hammock, which was perfect.
c. Personal Administration.

At this stage I was out of the elements and warm, indeed I was surprised how warm I was despite not adding insulation to the foam. I would say that this system is comfortable down to -12ºC (10ºF). There was however, an occasional draft across my face which was relieved by having the canopy as tight to the ‘no-see-em’ netting as possible. This would be alleviated by the Super Structure’s Over Cover. The major flaw of the system was that I was unable to cook in the hammock. I prefer to a use multi-fuel stove in this climate (e.g. MSR or Peak) but I feel that this method is excessively dangerous in the confined space of the hammock, especially as there is nowhere to rest a stove except on oneself. This is unfortunate as when you cook in a four man tent with a couple of stoves, a - 10ºC (14ºF) external temperature is sharply contrasted by +22ºC (72ºF) inside which enables clothes to be dried. The hammock entirely lost this benefit which is its greatest downfall. I cooked in a snow scrape but all the heat that would have warmed a shelter and therefore me, was lost to the environment. Perhaps the MRE type of self heating meal as used by the US military would solve this problem.
Recommendation 3. The hammock is excellent for living-in except for the issue of cooking. This requires thought as to a recommended method i.e. self-heating MREs, however, beware of the gas emitted especially in a confined space.
4. TAKE-DOWN. The reverse occupation is carried out, the insulating foam removed, all side guy lines untied and then, one side at a time, the ‘O-Rings’ of the canopy are wrapped around the hammock components and then the side guy is wrapped around moving toward the hammock extremity until it is tied-off at its very end in order to prevent tangles. The final result is a neatly wound hammock, as shown below.
One side is then removed from the tree and stuffed into the stuff sack until the opposite rope is reached which is then coiled into the sack. The hammock is ready to be re-erected at the next site in a minimum of time.
CONCLUSION
The Hennessy Hammock insulation system is capable of supporting a lone traveller in extreme cold weather environments down to -12ºC (10ºF) in the format tested. This was dependent on the sleeping bag used and a bag with a lower comfort zone than that used in the test will similarly reduce the -12ºC figure. This figure will also be reduced by: (1) adding insulation to the Under Cover e.g. spare clothing/suitable vegetation, (2) use of the Over Cover, and (3) a solution to cooking which would also heat the living space.

Even if the user is traveling in a group the system forces him/her to be solitary and to complete this undertaking. The traveller must be competent in cold weather skills, particularly personal administration. I would not feel safe allowing a novice to use this system as they may expose themselves to cold weather injury through lack of experience. However, for those comfortable operating in extreme cold the system works in all respects other than the method in which one can cook, but there must be solutions out there. The system has several added benefits: (1) snow will not weigh it down, (2) the user is out of contact from the freezing ground, and (3) there are few components e.g. no poles which are prone to freezing together or collapsing. However, there are drawbacks: (1) as a one-person shelter there is no mutually beneficial body heat from companions and (2) keeping an eye on one another is difficult. It would be impossible to treat/reheat injury/hypothermia in the shelter.
The arctic environment demands often bulky extra equipment and the insulation system is victim to this. The system however, is still light, comfortable, robust and flexible. Flexibility will always be the beauty of the system - it can be used outdoors or indoors, in the arctic or the jungle and anywhere in between; in that is it’s greatest strength.
The next step is to, (1) test the system with the Over Cover in order to complete the Super Structure system and, (2) trial methods of cooking.
HAPPY HANGING!
Test completed by Ben Reynolds
This report is purely the opinion of the author in a personal capacity and in no way reflects the opinion of the Royal Marines Commandos or the wider British Armed Forces who played no part whatsoever in the review.


